Wednesday, June 20, 2012

Summer Project with kids Gardening

This is our second summer project!
The Book we read to go with our gardening is "Family Garden" by Lia Leendertz.
This book gave us great tips for our herb garden.

Materials needed: Your choice of plants, Pots, Soil

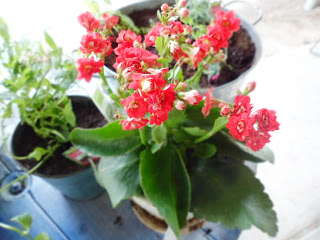
The Plants we decided to get :  Peppermint, Rosemary and my daughter picked Floral Kalanchoe for her pot and my son picked Chocolate Mint.
We found some cool tin pots in our thrift store for $1.00 and all I did was get a hammer and nail and added holes on th bottom of pots for good drainage.
We first placed soil in our pots half way then placed the plant in and filled the pot with more soil until filled close to the top.
Next add water and your done! You now have a wonderful herb garden!


Summer Project with kids Shell Frame


During the summer my kids and I love to do projects and read books that relate to the projects we are creating!  I will be uploading the crafts that we are creating and I will also place the title of book we read which corresponds to our craft.
Our first book we read was "Shells" by Catherine Chambers.

We decided to decorate a white frame with shells!
Materials needed: Shells, frame, all purpose tacky glue

Most of the shells we purchased at a shell shop but there were some that we had picked up from our camping trip in Rockport. So feel free to use any shells you may have.
I got these frames from a friend and I sprayed them with white paint and then I sealed the paint with a high gloss. If it is much easier you can purchase frames that are white and ready to decorate or you can ask the kiddos to paint the frames with kid friendly paint.

I chose Tacky Glue because it is  safe and not a strong odor glue. Perfect for the kids!

Get your frame and start gluing your shells on the wood border. Leave the frame to dry for 24 hours so the shells and glue stick really well!
Now that our frames are ready all we need to do is place awesome picture in them!


Saturday, May 12, 2012

Mother's Day Quick Chocolate Gift

My Mother Loves Chocolates and my little sister wanted to make her a chocolate bouquet and we came up with this!

Materials needed: *Bag of silver wrapped kisses,  * Bag of gold wrapped kisses,  *Foam ball shape,  *Sundae cup,  *Ribbon (used red/white feel free to use any color),   *glue dots, * wooden skewer, *Foil paper, *Paper to print out Happy Mother's Day on!

*Start filling the cup with silver kisses.

*Next cover the entire Styrofoam Ball with Foil Paper
*Using around 6 glue dots place on rim of cup then place the foiled ball directly on top of rim pressing down firmly.
*Make sure the ball is secure if not place more glue dots.

*Next get two glue dots and place on gold kisses and start sticking the kisses onto the foiled ball.
*Start with the gold kisses and start working from the bottom up.
*When you start on the second row of gold kisses instead of placing the kisses directly above another instead place in between kisses here is a close up picture.
*After you do two rows of gold kisses Get your Wood skewer and stick it in the foiled ball towards the back and a little to the side.

*Then the third row I chose to place silver kisses then then the fourth and fifth I used gold kisses until I reached the top.

*Next get your red paper and print out the phrase Happy Mother's Day! Place another white blank paper behind sticking it with glue dots. Cut your phrase in any shape I used some scissors that have designs then on the back of the paper place in a straight line down the middle some glue dots and glue it onto the wood skewer.

*Last get your ribbon cut 10 red and 10 white 20 inches long.
Get a single 10 inch ribbon and tie the bundle of 20 ribbons together.
 Get some scissors and start curling them after all are curled using the  white tie ribbon in the middle
attach the curled ribbon onto the skewer! Awesome your done!!!
                                                               Happy Mother's Day!
Thursday, May 10, 2012

Teacher Appreciation Craft Idea

I was on Pinterest and found a great Craft idea for Teacher appreciation gifts!
You can find More ideas like this one from this great website WWW.U-CREATCRAFTS.COM

I did this one for my son's 2 teachers!
My local Dollar tree carries a fantastic garden selection, but please feel free to purchase the items at any shop that carries garden items!

Materials needed: *Bucket    *Hand Shovel   *2 packets of seeds   *Garden Gloves  
                              *Artificial Flower   *Twine  *Paper(your choice of color)

*I printed in some yellow paper the following quote: "Teachers plant the seeds of knowledge that will grow forever!"

*I took my printed quote and stapled it to the packet of seeds.
*Get a flower and tie it to the twine that will be going around the bucket. Size will vary depending on the size of bucket you are using.
*Assemble your bucket first place the hand shovel, then the garden gloves and last place a little tape on the back of the seeds to tape  on top of the hand shovel so the quote sticks out of the bucket and it is visual! Awesome your done!
Two Gift under $10!

Wednesday, March 7, 2012

March Madness Sale!


MARCH MADNESS SALE!
I will be having a month long sale!
During the month of March Purchase any item and Get 15%OFF
Simply enter this code during check out
CODE: MarchSpecial


Thursday, March 1, 2012

Create your own Molds With Amazing Mold Putty!

Hi You all! Here is a video on how to make your own molds using Amazing Mold Putty!
This link will direct you to my Youtube Video!
http://www.youtube.com/watch?v=mClVMhqRN2I&feature=g-upl&context=G2c84e46AUAAAAAAAAAA


Here are a few items I have made using my molds and Polymer Clay!

Tuesday, February 14, 2012

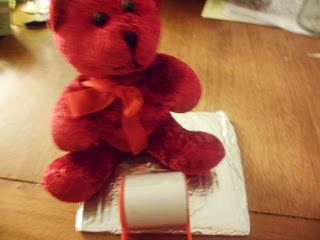
Last Minute Valentine Gift Ideas! Under $10

I made these for my son's Teachers!

Materials Needed:
*Stuffed animal
*Clear wrapping
*Wine Glass or Mug
*Foil Paper
*Card Board
*Clear Tape
*Scissors
*Shredded Paper
*Chocolates

1. Get your cardboard and cut a small square depending on size of your stuffed animal I used a 4x4
2. Next cut up some foil paper enough to cover the entire cardboard.
3.Place the cardboard in the middle of foil paper and fold foil onto cardboard.
4. Get your stuffed animal and place a double sided tape underneath stuffed animal and place the bear ontop of foiled cardboard.
5. Get your chocolates, shredded paper and drinking glass.
6. Start by placing a small amount of shredded paper inside the glass then some chocolates then some more shredded paper and last top off with chocolates.
7. Place a double sided Tape underneath glass and place on foiled cardboard.
Then wrap with clear basket wrap.
Done!
I hope you all enjoyed this tutorial!

Thursday, February 2, 2012

How to create a No sew Halter Top


Hi
Here is a quick tutorial on how to create a no sew halter top. Follow The link on the bottom!


 Follow this link to my youtube channel and I will show you step by step Thanks!
http://www.youtube.com/watch?v=ML6Ax_Nntd0&feature=g-upl&context=G26c6e86AUAAAAAAAGAA

Thursday, January 26, 2012

Upcycling is easy and fun!


This will be a quick tutorial!
Materials needed: Spray paint, Crystal Clear gloss finish spray, and the product you will be spraying


I love going to flea markets and garage sales and sometimes I find odd pieces that are very interesting but the color of the items does not fit my furnishings. So I decided to try spray painting some of my items and I loved the out come. Here are some before and after pictures of some of my items
 some are still underconstruction but I placed pictures so you can see what I have been working on!
Before
After
Usually I find most of the items I like are either gold and or tarnished so that is when the spray paints come in handy!


Step1. Make sure the item you will be spraying is clean and dry and that you are in an area very well ventilated outside preferably!
Step 2. Spray your item your prefered color.
Step 3.Let dry for atleast 1 hour in the sun and then do a second coat if needed then let it dry for another 4 hours.
Step 4. Spray the finishing gloss or matte finish onto your item.
Step 5. Decorate your area with your new Upcycled item!


Tuesday, January 17, 2012

Smashed finger! ouch


Hi I have not been able to do a video because I smashed my finger! It has been a week and the swelling has gone down. Let me tell you how this happened. I went to my parents home and my sister baked cupcakes well I wanted frosting on mine and I went to the bottom cupboard in search of my frosting and I did not see the glass jar full of salsa and I must have slightly moved it that it fell straight to my left finger OUCH!
So I will be posting a new How to in about a week! Thanks!

Monday, January 9, 2012

Pinterest Very Cool!

Hi everyone!
I just got hooked onto a great website called Pinterest very cool come by check it out or if you are already a member I will totally follow you let me know your name!
Here is mine:http://pinterest.com/vintagelover818/
Here are some items that I have found floating around pinterest!

I love this table idea I am thinking of doing this I will totally tell my hubby to help me out ofcourse!


Check these pants out I will be trying to sew some of these I hope I can find some great material at my thrift store!
Garter Devi Pants

Tuesday, January 3, 2012

Monday, January 2, 2012

Creating for Loved ones over the holidays!

Hi you all!
I was super busy over the holidays creating fantastic gifts for loved ones!
I took pictures of some my creations for you all to see so here are some!
This Necklace is a Snitch from Harry Potter
This pillow was made specially for an Elvis Lover!


Hair Bobby pin with Vintage look Typewriter key Inital

These are just a few items that I took pics of , but I made tons of other stuff and I hope my friends and family enjyed their gifts!
I wish you all a Happy New Year and I will be posting more "How to's" within the end of the week!